Posts

How I got started

Image
After going through enough commencement and graduation ceremonies in a rented gown, hood, and cap & hating the cheesy quality (like wearing a glorified dry cleaner bag), I started to think that I’d like to have my own, in decent quality fabric. After finding it costs circa $1000 for a decent set, I decided to investigate what it would take to make a set of my own (as a diversion as well a cost-saving/quality enhancing exercise). At first I thought about the gown, and learned a lot from a blogger who constructed her own PhD robe (not cap and hood) in 2008.   Starting with a Butterick pattern 5626 (church/choir robe) and altering it (single pleat in front instead of gathers, adding velvet collar and trim around front opening, and adjusting sleeves to puff around a shorter lining, cartridge pleating instead of gathering) as well as adding chevrons and piping per her alma mater’s design, she ended up with a very impressive reproduction of her school’s official robes, ...

Making the tam in velvet

Image
I'm making a dry run of the tam, adult sized, using scraps. Here are the steps I followed .

tam prototype 2

Image
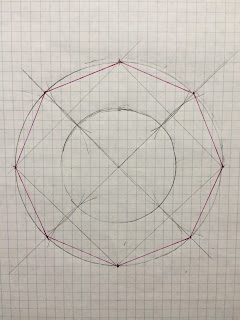
Using the tam pattern v 2.0 and the sizing calculations , I constructed a scale model in paper of a tam 14" wide for a head circumference 23". First, I drew the pattern.  The red octagon in the center marks the size of the top (14" on a scale of one square = 1"): Next, I cut it out and folded it: Then I used the compass to mark the headband seam line.  I cut it out with a seam allowance, clipped the seam, and added a 1" band approx 23" long (scaled): The result is more rigid than a fabric tam would be, but I stuffed it a little to puff out the shape, and voilà!

Second thoughts on cap construction

Image
After making the miniature prototype , then looking more carefully at photos online, I’ve change my mind about how to construct the tam.   I think the way to solve the pleating problem is not to pleat at all—to make darts instead of pleats.   The tam corners should be constructed by folding in along the eight edges, and then sewing a dart along the spoke lines.   Here is a paper example of the folds with seam lines marked: Here's how to make the pattern, with folding and sewing lines. And here's how to sew it .

cap pattern v 1.0-- in miniature

Image
To try out my first thoughts on the cap pattern , I made a miniature version of the tam.   I cut a piece of scrap fabric, with the actual-sized pattern on the graph paper plus another ½” (so roughly 9.5” diameter circle). I folded the sides of the octagon and pleated as I had planned , then basted near the edges. I used a compass to mark the seam line and the cutting line from the pattern, and I basted along the SEAM line (taking care not to baste through the bottom layer . I trimmed to the CUTTING line. I took a scrap piece of bias fabric (single fold, 1-1/4”) and basted it to the seam line.   Then I machine stitched along the seam, trimmed and clipped the seam, then hand sewed the other edge of the tape to the inside. I added a button to the top.

Robe pattern and colours

Image
The Vogue cape pattern ( 8959 ) is on sale, so I purchased it today.  I'm thinking of making it w/o the collar, just facing at the neck edge. Based on the line drawing on the pattern envelope, here's one way to recreate a version of my school's PhD robe: This model (a version of view C) would omit the collar from the pattern, add a decorative black velvet yoke and trim on front and around neck, and shorten about 6". Instead of chevrons on gown sleeves, I would sew the ends of velvet strips into the seams of the side panels of the cape. I would put three buttons (as on view A), one of which will anchor the hood.  Adding velvet strips down the front will help serve as a counterweight to the hood (augmented perhaps by inner mini pockets behind band to slip in weights). Here's how it would look in the rear, with an Aberdeen-style full hood trimmed in PhD blue velvet. Here is the front again, showing the hood. Earlier tho...

Pleating the tam?

Image
My first thought about making the  eight-sided tam  was that you had to pleat the fabric to make the brim.  I tried out this hypothesis using graph paper. First, I made an octagon using a compass and ruler: figure 1 Next I folded inward along the outline of the octagon, making pleats and moving counter-clockwise, which worked well until I got to the last fold (one point too short to reach band and another reaching out to the edge): figure 2 So I had to rethink the pleating pattern, and here’s what I decide on: Pleating the Tam First, crease along all eight sides of octagon, then open out again.   This creates a grid of lines for folding: figure 4 Next, fold inwards from the 8 sides in the following symmetrical pattern:    figure 5 The red dots  in figure 5  are defined by the creases in the original folding lines (figure 4) and in turn define the circle of the seam of the hat band .  ...

Must a doctoral hood have a cape?

Image
The Academic Costume Code of the American Council on Education, on the subject of hoods, says “the hood for the doctor’s degree only shall have panels at the sides”.  Does this mean (i) “Only a hood for a doctoral degree shall have panels at the side” (in which case the panels are optional)? Or does it mean: (ii) “In the case of the doctoral degree only, there shall be panels at the side” (in which case the side panels are required)? The "panels at the side" constitute the CAPE for a "full" (as opposed to a "simple" hood) on Grove's classification .   A hood without a cape will be lighter and so less prone to the slipping/strangling common with academic hoods.  But will it be authentically doctoral? Evidence for (ii)? Gardner Cottrell Leonard, The Cap and Gown in America , (Albany, 1896) on pages 12 and 13 illustrates Bachelor’s Master’s and Doctoral Hoods, and the latter have capes/side panels.  Here is the illustration from p. 13 Evi...